


 Rebuilding Coleman® Two or Three Burner Stoves
Chapter Two: Cleaning
![]() My video on how to clean a 2 or 3 burner stove can be found here.
My video on how to clean a 2 or 3 burner stove can be found here.
The sequence of cleaning parts is not important, but we will start with items that will take a little longer to finish.
2.1 Clean the small parts. If you wish to clean the soot, dirt and varnish off of your stove parts, I recommend using a bead-blast cabinet, soaking them in white vinegar (acetic acid) or in naval jelly (phosphoric and sulfuric acid). Since most people do not have a bead-blast cabinet in their garage, I will use chemicals for this example.
 Acids can burn you. Please use with caution and read the manufacturer’s warning labels before using. Click here to access our Safety Data Sheet (SDS) pages for additional information.
White vinegar is the easiest way to clean parts. It may take some time, but it works well. Using naval jelly is faster but it is also quite messy.
I strongly recommend that you do not soak the valve body in vinegar. The lighting lever stem packing is inside the valve body and submerging it in a liquid can cause damage. If your valve stem packing is still in your valve stem nut, don't soak that in vinegar either. Clean these parts with naval jelly, or just use a metal brush and carburetor cleaner on them.
The stove's pump handle, pump cap and ball nut are probably nickel plated. You can clean them with vinegar or naval jelly as described below, just use caution. Do not use a wire brush on the pump cap.
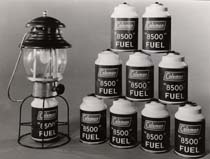
Place the selected brass and burner parts in a glass or plastic container, then pour in enough vinegar to submerge them as shown in Figure 1. Allow them to soak for an hour or so.
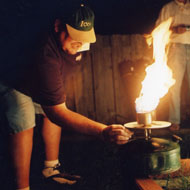
Brush naval jelly on to the parts selected for this method as shown in Figure 2. Allow them to sit covered with naval jelly for 30 minutes or so.
Remove the parts from the vinegar and/or naval jelly bath and rinse them with water. Take a small brass or wire brush and scrub each part well. Rinse again with water and clean them with a rag. If you want a shine on the brass, use 0000 steel wool after cleaning. Parts cleaned with naval jelly will not have the pinkish hue that vinegar will give you.
 |
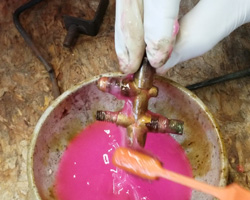 |
Figure 1 |
Figure 2 |
2.2 Clean the pump assembly. Lay out the pieces of your pump. If there is any dirt or grease left, spray the part well with carburetor cleaner and use a toothbrush to clean it.
Pay special attention to the pump cap. The plating is very thin, and you will end up with a brassy-looking cap if you're not careful. Spray household cleaner rather than carburetor cleaner and use a soft brush. You'll need to be persistent to remove that dark ring around the center hole. Also use a cotton swabs to clean the under-side where it contacts the tank.
2.3 Reassemble the pump assembly. You want to assemble your pump now so that you can soak the pump cup. Slide the pump cap and return spring on the pump plunger. Thread the backing plate on the bottom of the pump shaft with the raised side facing the bottom. Snug with pliers.
Place the pump cup on the end of the pump. Center the shaft in the leather hole and install the lock nut or push-on nut over it. Pull the outer edges of the pump cup back to form the shape of an umbrella (Figure 3).
Lower the leather pump cup down into a small cup of Neatsfoot or other light oil. Ensure that the entire leather cup is submerged in oil (Figure 4). Allow the pump to set this way for at least an hour. You do not need to do this step with a rubber or plastic pump cup.
 |
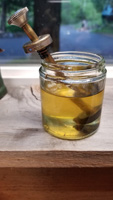 |
Figure 3 |
Figure 4 |
After soaking the pump, wipe off the excess oil. Pat-dry the pump cup and blow-out the oil trapped inside the pump shaft. Set the pump aside.
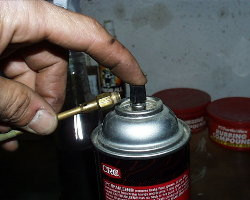
2.4 Clean the fuel tube. Remove the fuel tube from the vinegar bath. Rinse in water and place it on a cloth. Hold the tube with one hand and spray carburetor cleaner into the large end (Figure 5). Get your valve body and use the metering rod to plunge the fuel tube from the bottom. Move it in and out numerous times to dislodge any varnish inside the tube as shown in Figure 6. Remove the rod and re-spray inside the tube. Repeat this process a few times to ensure it is clean.
Blow compressed air into the little end to remove the cleaner and corrosion. If you don't have an air compressor, shake the tube with the large end down to remove as much cleaner as you can, then blow through the tube from the little end as hard as you can.
Clean the metering rod with steel wool and wipe it clean with a cloth. Once you have finished this, install the fuel tube over the metering rod and snug it up with a 3/8" end wrench. Set the valve aside.
 |
 |
Figure 5 |
Figure 6 |
2.5 Clean the inside of the tank. Fill the tank with hot water and shake it around. Observe the water as you pour it out. If you can see dirt or rust in the water, continue the wash cycle until it comes out clear.
Shake the tank vigorously, removing as much water as possible from the inside. Shine a flashlight into the fuel hole and look in the fuel filler cap hole at the inside-bottom. A clean tank will look like bare metal or have a cream-colored painted look to it. If you can see heavy rust or a black crud inside, use abrasion and/or vinegar to break it free.
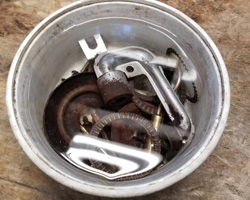
The “abrasive” can be small screws, nuts, washers, BBs, etc. Pour these small metal objects into your fount and shake them around. Shake hard enough to break the corrosion free, but not so hard that you leave dimples.
Continue to wash, shake and rinse until the inside of the fount is clean and as rust-free as you can get it. Shake vigorously one last time to remove most of the water. Pour some stove alcohol in the fount and shake it around, then allow it to completely air-dry.
2.6 Clean the outside of the tank. Removing dirt, grime and oxidation from a stove tank is no different than if it was an old car. You must use caution, however, as rubbing compound is abrasive and you can rub too much.
Start by spraying the tank down with a household cleaner. Be sure to spray the inside of the pump cylinder too. Give everything a good soaking. Take a soft damp rag and gently remove as much dirt and grime as you can. If you have a heavy black deposit (varnish) on the tank, take your time and get it off with cleaner.
Use a toothbrush to scrub the inside of the pump cylinder until it feels smooth. Hold the tank on end and spray the cleaner up inside to rinse the grime out.
Use the toothbrush to clean the grime from the flaps and the seam around the tank.
Open a can of automotive rubbing compound and spray in some cleaner to soften it up. Lightly dab the toothbrush into the rubbing compound and use it to clean around the fuel filler hole, the pump cylinder hole and the seam. Use a soft damp rag and a circular motion to apply rubbing compound to the rest of the tank.
With a clean soft rag, rub the dried rubbing compound off the tank and buff to a shine. If the compound does not want to come off, give it a quick spray of household cleaner and try again. Use a dry brush for the pump cylinder, filler hole and seam. Follow this with polishing car wax to really make it shine. The before and after can be seen as Figure 7 and Figure 8.
 |
 |
Figure 7 |
Figure 8 |
2.7 Clean the grills. The best way to clean your grills depends on the age and condition of your stove.
For newer or very clean stoves, the easy way to get the grills clean is spray them with oven cleaner, then scrub with a stiff wire brush just as you would with your BBQ grills.
Sometimes old stove grills can be so heavily crusted with food and corrosion that oven cleaner does very little to remove it. If your grills are this bad you might try hydrochloric or muriatic acid, harsh chemicals found in toilet bowl cleaner. Lay the grills out on a flat surface that you can throw away (like cardboard) and apply a generous coat. Allow this to sit for an hour or two, then wash off with water. Turn the grills over and clean the other side. Apply a light coat of vegetable oil when dry.
Very old stove grills did not receive any sort of plating and may now be excessively rusty. Naval jelly does a great job but if they are really bad you may want to try electrolysis, a process of passing electrical current through a solution to remove rust. This is a very easy and effective process requiring a battery charger, a plastic tub large enough to hold the grill and washing soda. If you would like to use this method, please refer to cleaning page in the learning center.
2.8 Clean the case & lid. This is an area that might not come out as well as we’d like it to. Old stoves are usually coated with dried grease that hardened to the paint years ago. I have not found a fool-proof method of removing the grease while leaving the paint intact. I can tell you that harsh cleaners, kitchen scrubbers and even prolonged soaking in soapy water can destroy the case paint job.
The best way I have found to clean them is a good household cleaner like Simple Green®, warm water and a soft rag or sponge. Once you are finished, rinse the case off and allow it to dry. Wiping it down with a product like Armor All® helps bring back some of the shine.
![]() Caution: Be very careful in cleaning the case. There are razor sharp edges inside and they will cut you.
Caution: Be very careful in cleaning the case. There are razor sharp edges inside and they will cut you.
2.9 Clean the manifold. Separate the burner tubes from the burner boxes and U-tube by unscrewing them. Soak the entire manifold in hot soapy water for 15 minutes or so and then allow to dry.
Coat the outside of each piece with naval jelly and allow them to soak for 30 minutes or so. Use a small metal brush and warm water to clean them. Allow to dry.
2.10 Clean the fuel filler cap. The original cap should match your tank. Clean the cap (and screw if applicable) as you did the tank. I recommend you always use a new fuel filler cap when operating any stove or lantern. If you would like instructions on how to remove and replace the filler cap gasket please click here.
2.11 Clean the valve wheel. Soak the valve wheel with a household cleaner, then clean with a toothbrush and a soft rag. Must of the grease will be on the back side so clean it well there.
2.12 Rust Protection. Because many of your stove parts are steel, they are susceptible to rust. These parts leave the factory painted, but the paint is often destroyed after years of use.
I recommend you gather the following parts and apply a high-temperature silver paint to protect them from rust: manifold, burner bowls, burner caps, burner screws, burner boxes and the nuts & bolts used to attach the manifold to the case. You may also want to paint the drip tray (Figure 9).
 |
Figure 9 |
Your stove is now clean and is ready for re-assembly.