


 Special Tools: Lantern Clamps
It is difficult to work on a lamp or lantern if you don't have a second pair of hands to hold it down on the work bench for you. It takes force to remove some of the parts and you'll need assistance while doing it.
You can spend a lot of money on a clamp for your lanterns. However, it is my opinion that this hobby stay inexensive when possible so I'll show you two lamp & lantern clamps that I have made and use in my shop. The first one you may already own, and the second can easily be made with scrap plywood and a few common items. They both work well and keep the fount secure.
After a year or so, you'll realize that you didn't need a lantern clamp as often as you thought you would.
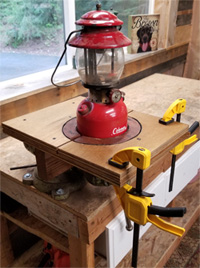
The Workmate® lantern clamp. As long as you still have the four little feet that go with the tool, you're all set.
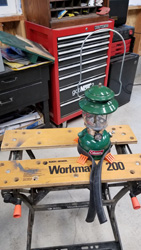 If you have children, borrow a bicycle inner tube from them. If not, spend a few dollars and go buy one. Wrap the lamp or lantern with the inner tube and then clamp down on it. This grips the fount well and also protects it from scratches.
My Workmate® 200 would not fit a large catalytic heater or a small 242-sized lantern, so I had to drill a few extra 3/4" holes in it. It works great and I still use it to when working on old catalytic heaters.
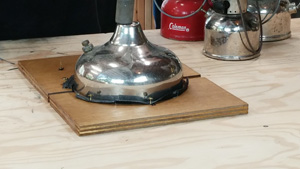
The plywood lantern clamp. The lantern clamp I built will hold 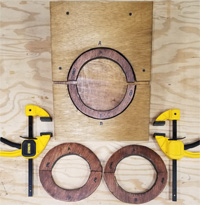 Coleman® Quick-Lite lamps, double-mantle lanterns and both sizes of single-mantle lanterns, plus a number of single-burner stoves. You can adjust sizing to fit your needs: if you don't need to work on lamps you can make yours to just hold lanterns, or you can make it large enough to hold catalytic heaters. The simplicity allows you to make whatever adjustments you need.
Tools & Materials:
(1) 1/2" plywood, cut to 16" x 12"
(1) 3/4" plywood, cut to 16 x 12"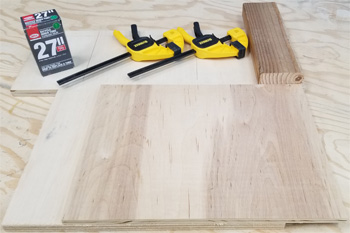
(2) 3/4" plywood, cut to 8 1/2" square
(1) 12" section of 2x4
(1) Bicycle inner tube
(2) Small quick clamps
Wood screws, contact cement or other glue, scissors, pencil or Sharpie®, jig scroll saw, table saw, rasp or sander, hand drill, razor blade.
I used a "CQ" lamp (8 3/16"), a 220 double-mantle lantern (6 1/16"), a 200A single-mantle lantern (5 5/16") and a 242 single-mantle lantern (4 15/16") as a template for the clamp jaw and insert rings. If you don't happen to have the lamp and lanterns I used for a template, you can draw the circles with a compass, or plates and saucers if you can find the correct sizes.
These are measurements using a rule and my old eyes, not a micrometer.
Step 1: Cut the table, grip, jaw and inserts. Cut the plywood and 2x4 per the dimensions shown above. The 2x4 is your grip, the 1/2" plywood will be the table and you'll cut the jaws and filler rings from the 3/4" plywood.
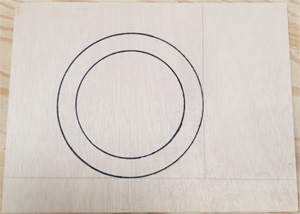 Step 2: Center and offset where the lamp/lantern will be. You want the lamps or lanterns to be centered side-to-site, but set slightly forward on the table. For an 8" fount to be centered on an 12" table, draw a line about 2" from the edge. For the offset draw a second line about 5" from the right adjacent edge.
Step 3: Trace the jaw and first insert. Place a "C" fount on the center and offset lines, then trace the outside diameter with a very heavy pencil or Sharpie®. I used a Sharpie® because the line needs to be really thick for the cutting phase. Take a 220-sized fount and center it in the first circle, then draw a second smaller circle. You now have the outline of the vice jaw and first insert ring.
![]() Warning! Don't use a Sharpie® on a mint-condition painted lamp or lantern. You will get a black ring around the base of the fount. Use a very thin pencil or a dry-erase marker instead.
Warning! Don't use a Sharpie® on a mint-condition painted lamp or lantern. You will get a black ring around the base of the fount. Use a very thin pencil or a dry-erase marker instead.
Step 4: Trace the other insert rings. Set the lamp fount on your smaller pieces of 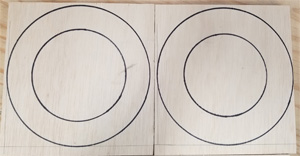 3/4" plywood and draw the outer rings. Center a 200-series lantern inside one of the rings and a 242-series lantern inside the other.
Step 5: Cut out the circles. Take your time and try to make "perfect" circles, paying attention to what side of the thick line to cut on.
Cut out the small circle on the jaw plate first. Cut on the outside edge of the thick line.
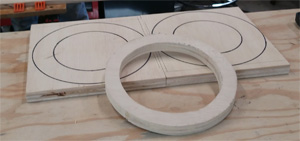 Now drill a few small holes along the inside edge of the larger circle to get the saw started and cut along the inside edge of the line. Once you have completely cut the ring out, go back to the jaw plate and trim along the outside edge of the thick line. This will give you room for installing the rubber strips later.
Duplicate this process for the insert rings on the other pieces of plywood. Cut along the outside edge of the smaller circles and the inside edge of larger circles. Save the leftover pieces of the insert plates for use at the table saw.
Step 6: Test-fit the jaw and rings. Because of the way you cut the circles, there should be plenty of room (slop) to fit the lamp and lanterns in the holes cut for them. Also, the rings should fit inside the hole you cut for the clamp's jaw. Re-trim, rasp or sand the outside edge of the rings to make them fit sloppily inside the jaw's hole.
![]() You should be able to spin each insert ring 360 degrees inside the jaw's hole, and also fit each lamp/lantern easily inside their appropriate hole.
You should be able to spin each insert ring 360 degrees inside the jaw's hole, and also fit each lamp/lantern easily inside their appropriate hole.
Step 7: Cut everything in half. Take the jaw plate and draw a reference line side-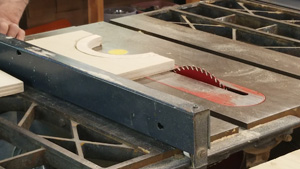 to-side through the center of hole. Re-insert the ring you cut from it, and then run them through the table saw using the reference line to cut them in half.
![]()
Get as close as possible but don't worry about cutting the jaw or insert rings exactly in half. You will make adjustments later and will mark each piece according to which side it fits better.
Because you don't want the jaws of your clamp to touch when you insert a lamp or lantern, you need to trim a little material off the ends. Run the first half of the jaw and insert back through the table saw, trimming about 1/8" off the edge. Set the other half in the saw and trim the same amount.
Use the scrap cut-out of your smaller plywood plates to safely hold the insert rings as you run them through the table saw. As before, cut the rings in half, then trim about 1/8" off each of the halves.
Step 8: Test and mark your halves. Set the jaw halves down in front on you, close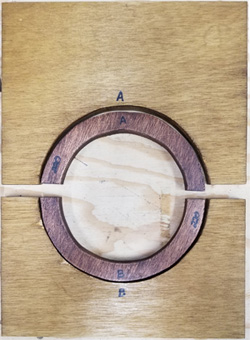 them and place the first set of insert rings inside. You are looking to ensure that the rings are not "taller" than the jaw. Return one or both halves to the table saw as necessary. Note that the rings will fit one way better than the other.
Once you know that all three sets of insert rings will fit inside of the closed jaw, you can mark them to show what side of the clamp they fit in, and also which lantern they are used for. I marked "A" and "B" sides of my jaw and all three rings.
Step 9: Cut the inner tube. Use scissors to cut the valve out, then clamp one end of the tube to hold it. Pull it taught and run your scissors along the top edge to get a nice clean cut. Flip the tube over and pull it taught again to cut the other side. When you're done, you'll have two long pieces of rubber.
Use rubbing alcohol to clean that white powdery stuff inside the tube. Cut a strip of rubber that will fit inside one half of the jaw, but about 1/2" shorter. You don't want rubber going beyond the jaw or insert. Cut a strip to fit the other jaw half, and then cut a pair for each insert half.
Step 10: Glue the rubber pieces in.
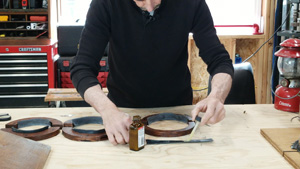 I used contact cement for the unique combination of wood and rubber, and it worked well. Apply a coat of adhesive on the clean wood surface, and on the side of the inner tube you just cleaned. Allow them to sit for a few minutes, per the bottle's instructions. Press the inner tube up against the curved wood piece and smooth it out to remove bubbles. Ensure that the bottom edge of the rubber strip is even with the bottom edge of the wood.
 Because you are bending a flat piece of rubber, the top will want to pull away from the wood. To cure this, cut the top overhang of rubber into 3 or 4 sections, then place the halves around the applicable lamp or lantern. Use a thumb tack or similar to hold down the flaps as it dries.
Allow the pieces to sit for an hour or more before disturbing.
Step 11: Trim the excess rubber. Remove the lamp or lantern and hold a razor blade at the top edge of the wood and cut-off the top flap of rubber all the way around the clamp and inserts. Take your time so that you don't pull the rubber away from the wood. Smooth the rubber against the wood one more time as it should still be a little pliable. 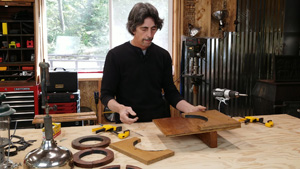
Step 12: Secure the grip and clamp to the table. Take your clamp's table and drill(3) pilot holes approximately 4" from one edge. Center your 2x4 under the pilot holes and drill (3) wood screws in to secure the table to the grip.
 Drill (4) pilot holes in the corners of the larger half of the clamp vice. Align the jaw on the table with it sitting over the grip. Drill (4) wood screws through the jaw into the table to secure it.
Step 13: Enjoy your new clamp. Set the lamp or lantern in the jaw of the correct size. Press the other half of the jaw against the appliance. Use a wood clamp to secure one side of the jaw, then press on the other side with some force and clamp it down with the second wood clamp.
Did you find this information useful? Click here to support the Old Town Coleman Center with a cup of coffee!