
 How to Light an old Coleman® Stove
These instructions were written to help you safely light and operate an old Coleman® stove that you have never lit before or has been in storage for a very long time.
![]() An old or dirty stove can quickly turn into a raging inferno if it is dirty and/or you don’t know what you are doing.
An old or dirty stove can quickly turn into a raging inferno if it is dirty and/or you don’t know what you are doing.
First, please take the time to read our Stove Safety page.
If you don't have previous knowledge of the stove you are working with, or if you do not know how long it has been sitting, please perform each step. This will help you confirm that the stove is safe to use, and that it functions as in should. If you need to make repairs, I will provide links to other sections of this website.
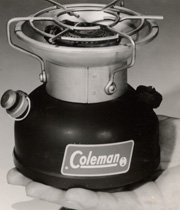
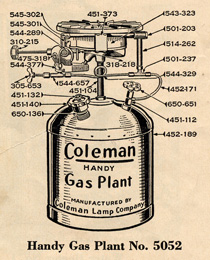
Please click here to see an exploded view of a stove that will open in a new browser. It also has a list of parts you should have or may need.
1. Remove everything from the case and spray it all down with water. Remove as much dirt and grime as you can.
2. Remove the fuel filler cap from the tank and pour the old fuel into an approved container for disposal. Use a length of small clear tubing to siphon what you can’t pour out. You can find a local hazardous waste recycling facility by doing an internet search.
3. Smell the inside of the tank. If it has a strong really sharp smell, that is varnish from old gasoline that has gone stale. Varnish can coat the internals and block them. If it smells real bad you might need to tear it apart to clean the internal parts.
![]() Unless you know it is less than a few years old, always replace the fuel filler cap. A new replacement cap is critical for safety and will keep your stove pressurized much longer.
Unless you know it is less than a few years old, always replace the fuel filler cap. A new replacement cap is critical for safety and will keep your stove pressurized much longer.
4. Wash out the tank with a cup or two of clean unleaded gasoline or camp fuel. Reinstall the cap and shake the tank vigorously for a few minutes, then siphon it out. Repeat until the liquid coming out is clear. Reinstall the filler cap when done.
![]() If the Tank is excessively rusty please refer to our rebuild pages for help with cleaning it out.
If the Tank is excessively rusty please refer to our rebuild pages for help with cleaning it out.
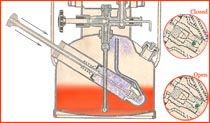
5. Check to make sure that your valve wheel is turned fully clockwise to the closed position. Rotate the pump handle counterclockwise one full turn, place your thumb over the hole in the end and give it a few pumps. If there is no resistance when pressing down on the pump, you need to repair it before continuing.
6. Pump the tank 25 strokes. Press the pump handle down and lightly place your finger over the hole in the end. If the pump raises, you need to clean or replace your check valve.
7. Fill the tank at least half-full with clean unleaded gasoline or camp fuel. Tighten the filler cap and give it 20 pump stokes. Allow it to sit for a few minutes while you watch for leaks. Any leak is unacceptable and must be located before you light it.
8. Place a cloth over the end of the Generator to catch the fuel. Turn the lighting lever to the up position. Open the fuel valve one full turn and wait. Within a few seconds you should have a stream of gasoline shooting out the end of the generator. Once this starts, close the valve and set your tank aside.
![]() If no fuel comes out, open the valve another turn to see if it starts to flow. If it does not, you must troubleshoot this problem.
If no fuel comes out, open the valve another turn to see if it starts to flow. If it does not, you must troubleshoot this problem.
9. Set the case in front of you and open the grill(s). Locate the master burner--it is the one the generator goes over. In a two burner stove it will be on the right and in a three burner stove it will be in the center.
10. Locate the large butterfly handle(s) on the side(s) of the stove and turn it (them) fully clockwise to close the auxiliary burner(s).
11. Use a flat-head screwdriver to remove the large screws in the center of the burners. Remove each burner off to expose the burner boxes below. Keep the parts together and remember where each set of burner rings go.
12. Use an air compressor to blow-out the manifold by holding the air nozzle in the same hole the generator goes in. Allow the air to flow for a few seconds to clear any insect nests or other blockages inside the manifold.
![]() Note: If you do not have access to an air compressor, I recommend you insert a wire or metal clothes hanger into each Manifold opening and then use “canned air” to blow it out. You have to ensure that each "pipe" is clear from any blockage.
Note: If you do not have access to an air compressor, I recommend you insert a wire or metal clothes hanger into each Manifold opening and then use “canned air” to blow it out. You have to ensure that each "pipe" is clear from any blockage.
13. Open the auxiliary burner(s) by turning the large butterfly handles. Repeat step 12.
14. Close the butterfly handles. Reinstall the burners and install the tank on the case.
15. Light a match or lighter and hold it over the master burner. Open the valve fully. If the Master Burner does not ignite within 10 seconds, extinguish the match/lighter and close the valve. Investigate this failure by returning to step 8, then re-cleaning your manifold as necessary.
16. Once the master burner ignites, allow it to burn for about 30 seconds. You should see the yellow flames settle down into smaller blue flames. Turn the lighting lever to the down position and pump more air into the tank as needed.
17. Hold a match or lighter over the auxiliary burner and open the butterfly handle to light it. Repeat for the other burner if you have a three burner stove.
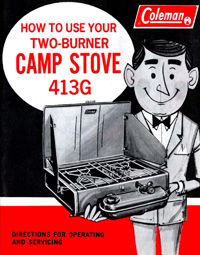
18. You can adjust the flame with the valve. Click here for an owner's manual on your stove if you don't have one.
Did you find this information useful? Click here to support the Old Town Coleman Center with a cup of coffee!